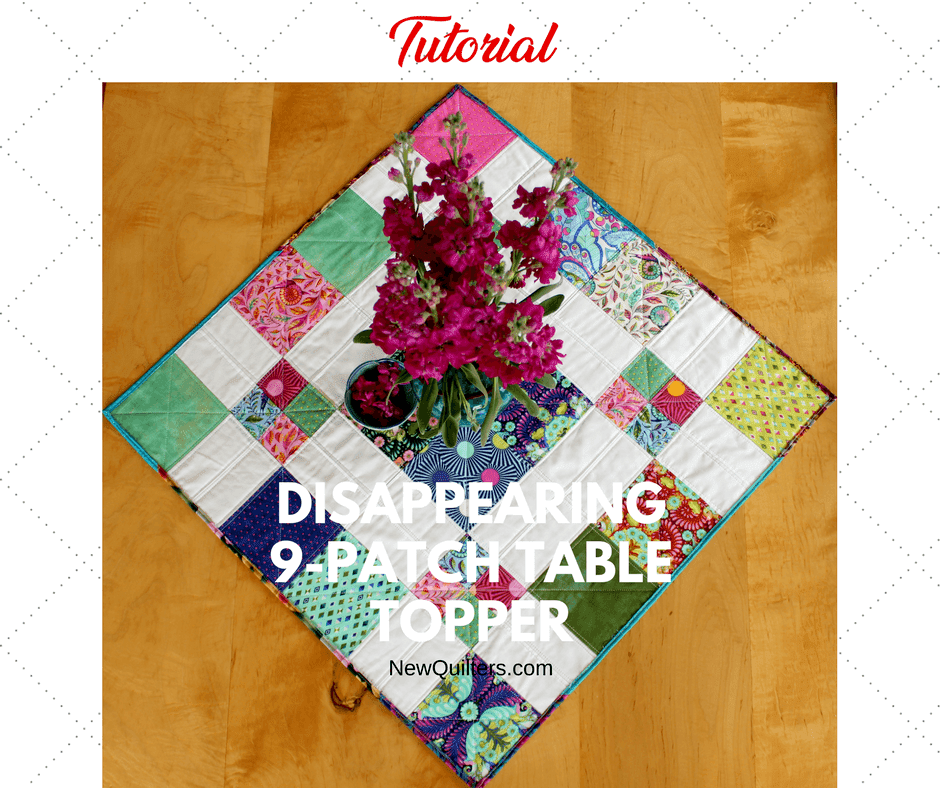
Disappearing 9 Patch Table Topper Tutorial

26″ Square Table Topper
This pretty little quilt makes a great table topper or small wall quilt for any celebration. You can use fabrics that work with any holiday: Christmas, Hanukkah, Easter, Valentine’s Day, Independence Day, Halloween — or just choose any fabrics that appeal to you. Here’s a little gallery of table toppers I’ve made for different seasons:
Step by Step Instructions
Start with 36 five-inch fabric charm squares:
- 16 white squares. I buy solid white charm squares 100 at a time on eBay and use them for all kinds of quilt projects.
- 20 colored squares. Most of the squares I used for this table topper came from a Kaffe Fassett charm pack, supplemented with a few others I had lying around. I find the finished quilt is livelier if you get your squares from more than one charm pack.
Arrange the squares into four nine-patch quilt blocks. Each block should have colored squares in the outside corners and center, like this:
Here are the four blocks I made for this table topper:
Pay special attention to the center squares. They will be sliced up into smaller squares and may get turned around in different directions, so it’s good to choose a simple print that looks good from any angle. You might even want to use the same fabric for all the center squares.
Once you have your squares arranged in a way you like, sew the nine-patch blocks together. I sew mine one row at a time, working from left to right.
Here’s an action shot of the third square being added to one of the rows in the block:
Once all the squares in each row are sewed together, press the seam allowances in each row in opposite directions. This will make it easier to match the corners of the squares when you sew the rows together.
Sew the three rows together. I usually work from top to bottom.
Pin at each seam intersection to make sure the corners of the squares in each row match up with the corners in the next row.
When you have all four blocks stitched and pressed, lay them out in a square on your cutting table: two blocks in the top row, and two in the bottom row. Use your ruler and rotary to cut each block in half both vertically and horizontally. Here’s how my blocks looked after I cut them:
Now comes the challenging part: rearranging your cut-up blocks into a cool new pattern. (I actually have my husband do this part because he’s much better at seeing spatial relationships than I am.) Here’s how the blocks looked after he rearranged them:
You can arrange yours like mine, or you can arrange them however you like. It’s like putting together a puzzle. I recommend taking some time and leaving your arrangement overnight before taking a last look at it. You may be surprised at what you notice after you’ve stepped away for a few hours.
After you arrange the blocks in a way you like, sew the cut blocks together again. Getting your corners to match perfectly will be harder this time around, because the seams of your turned-all-directions blocks will not all nest perfectly. Use pins to make everything match as well as you can, then just learn to love it if the points aren’t perfect. That’s my motto!
Layer the top with backing fabric and batting, then baste with basting spray or safety pins:
Quilt the layers. I did all straight-line quilting on this piece.
First, I sewed diagonal lines all over the quilt:
I also bracketed the horizontal and vertical seams with straight-line stitching that looks more or less like the stitching on this Christmas table runner (but forgot to take a good photo of it).
To bracket a seam, just place one side of your presser foot along the seam line and set your needle position at a pleasing distance from the seam. I used a quarter-inch distance on this quilt. Then sew along the seam line, using the presser foot edge as a guide. Turn the quilt around to sew in the other direction.
After binding, the table topper looked like this:
All in all, it took most of a day to complete this project. I’m currently making another one using some Valentine’s red and white fabrics I got from my friend Ruthmary. Update: here’s the finished Valentine’s table topper.
Yet another update: Here’s a version I made in modern winter colors.
If you make this quilt, please leave a photo in the comments. I’d love to see how yours turns out!
Thank you so very much for this tutorial! I have a large square coffee table and have made several of these to put on display for the various seasons. They look great, turned “on point”. I will post some pictures as I find time.
Sue Martin
How can I print this I would really like to make this for my table
You can just print the web page from your computer or phone, but if you give me a few days, I will post a PDF version of this post. Thanks for making me think of it, Mia!
So is there a physical pattern I can make a copy from? Thank you!
Sorry for the delay in replying, Susan. I was thinking about whether I have time to make a PDF pattern for this quilt right now, and the answer is that I have to wait for a couple of other projects to get finished. You can always print out the blog post and use the instructions in paper form.
What size are the diamonds that you used to set the hexie with the green leaves together?
Sorry Suzanne, there are no hexies in any post on my blog because I’ve never sewed with them, so I’m at a loss to answer your question. Write back if you can give me any more information on your question.
I love this, but have a question. Can this technique to used to make something other than a square? I would love to make this as a 36×48 inch wheelchair quilt. Thanks for any ideas you can give me. Enjoy your email newsletters.
Hi Patricia. You can make a larger quilt by simply making more nine-patch blocks. The size of this table topper is 27″ square, and is arranged in two rows of two nine-patch blocks each. Making the quilt 3 x 3 blocks would make the quilt about 40″ x 40″. A layout of 3 x 4 blocks would make a quilt about 40″ x 54″.
Sorting out the blocks after recutting them would be more involved, and might not produce the perfectly symmetrical layout of this quilt. I haven’t tried it, so am not exactly sure how it would look, but I think it would be interesting. I have also made a long, skinny table runner using the same disappearing nine-patch technique. You can see it here.
Christine: Thank you so much for your quick response and solution to my issue.
SIZE OF THE SQUARES??? Large (16) and smaller ones???? Please!
Thank you!
Judith
Hi Judith,
You start out with 5″ squares. (I got mine from a precut 5″ pack.) Then you sew four nine-patches from the squares and cut them up, as shown in teh tutorial, and resew them. The cutting step is what produces the smaller squares. Hope this helps.
Thank you for the instructions on this table topper.
Very “easy to follow” instructions….thank you!!
Glad you found the tutorial helpful, Pat. If you make the quilt, please post a photo in the comments — we’d love to see it!