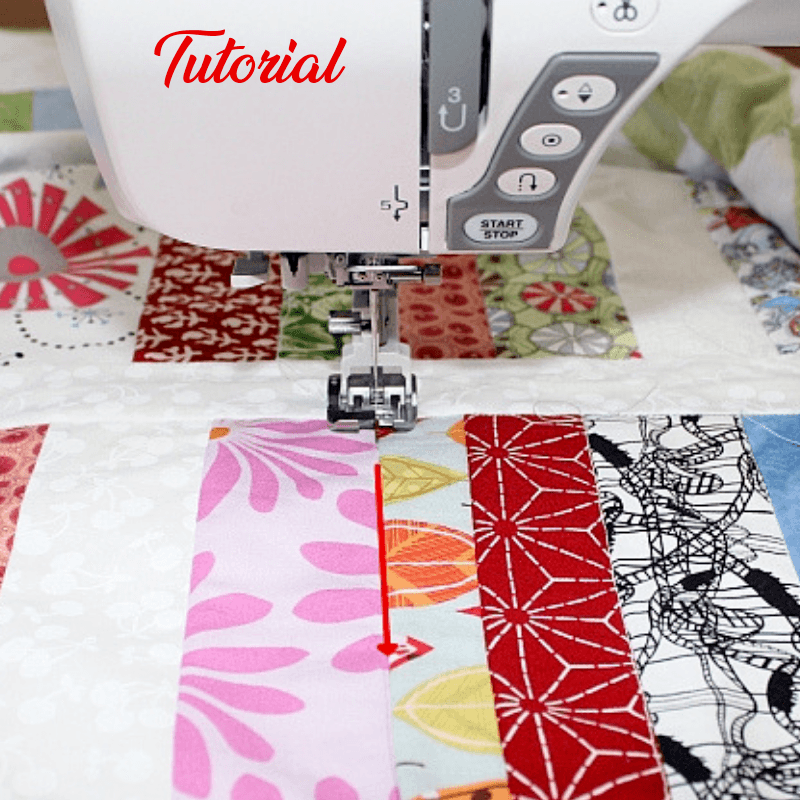
How to Stitch in the Ditch for Quilting

Once you have a quilt top finished and the quilt layers basted, the next step is stitching the layers together.
How do you start? For me, that’s an easy decision: I always start by anchoring the quilt layers together with straight-line machine quilting. I do this by stitching along existing seam lines in the quilt top — more commonly called “stitching in the ditch.”
How does stitching in the ditch work?
Every seam in a typical quilt has a little raised fold on one side where the seam allowance was pressed to the side after piecing. The “ditch” is the low side of the seam line, right next to the fold.  Stitching in the ditch means sewing as close to the fold as possible. Done with skill, your stitches can hide so well that they’re almost invisible. (I’ve never been that good, so I aim to make my stitches merely unobtrusive, and that works fine for me.) I also try to make sure my anchoring quilting covers every section of the quilt. That way, the quilt will be stable and (I hope) will stay wrinkle free while I add any fancier stitching to the quilt.
Step by Step Instructions
- Check your batting. The batting you choose determines how close together your anchoring seams need to be. Today’s high-tech battings can usually be stitched up to 8 inches apart without bunching up when the quilt is used and washed. Make sure by checking the batting manufacturer’s instructions to see how closely you need to quilt yours.
- Decide how much anchor quilting you want to do. You may want to only sew a few seams. This diagram shows how you might stitch a fairly complicated quilt in the ditch by simply outlining every block.

Quilt photo by Jessy Roos, Flickr. You may want to do denser stitching. This diagram shows how you might stitch some of the inner seams in each block as well as the outer seams around the block.

Quilt photo by Jessy Roos, Flickr. It’s even possible to stitch every single seam in the quilt. (Unfortunately, my diagramming skills aren’t up to showing that on a photo.) I often do stitch every single seam because I like stitching in the ditch and I also like to be sure that my quilt layers are well and truly anchored together. It’s not really necessary to go to that length if you don’t enjoy doing it.
- Choose a thread color. Most quilters want their stitching in the ditch to be as close to invisible as they can get it. With that in mind, choose a thread color that blends in with as many of the colors on the quilt top as possible. If the quilt top is mainly light colors, I usually choose a pale gray or beige thread. If the quilt top is dark, choose a dark thread that blends in with the dark colors on the top. A dark gray should blend in with most dark colors.
- Check your thread weight. Ideally, you should use the same brand and weight of thread for both the top and bobbin threads. This minimizes the potential for broken thread or other thread problems. I usually use 50-weight quilting threads from Superior Threads or Aurifil. You can use different colors on the back and front, though. If you really want your thread to be invisible, you might try using a see-through monofilament thread. (Warning: many sewing machines are finicky about monofilament threads.) For beginners, a neutral cotton or polyester quilting thread is just fine.
- Use a walking foot. A walking foot is a special attachment for your sewing machine that helps push all the fabric layers under the needle at the same speed. This makes stitching in the ditch easier and helps you avoid getting wrinkles on the back layer of the quilt.

- Choose a presser foot. Your machine may have a foot designed specifically for stitching in the ditch. My stitch-in-the-ditch foot has a little projecting fin that rides right in the depression along the seam line and helps me guide my stitches. Instead of trying to watch where the needle is going, I just watch that little front fin. You can buy this kind of foot for most sewing machines for about $15 U.S. If you don’t have a stitch-in-the-ditch foot, use one with a transparent center, so you can see the needle as you sew along and stay in the ditch as much as possible.

- Start stitching in the center of the quilt and work out to the edges. I always start my anchor quilting on one of the quilt’s center seams and work my way out to the left and right (or top and bottom) edges. This gives me the chance to smooth away any wrinkles that may develop in the batting and backing fabric as I sew the seams in the middle of the quilt. Once you have sewed all the vertical seams in the quilt, turn it 90 degrees and sew all the horizontal seams.


Thanks for sharing about quilt in the ditch I am going to do some finishing touch for my cushion covers and if there is anything different I would like Ito learn as I have never done it before thanks
Have you posted the way you finish the quilt as you go blocks yet? I do like the way you have quilted as you went along. As you are really quilting when you sew each new strip to the block and batting (and backing), I have usually just done some swoopy curvy quilting to finish blocks like these. But I like your way as well or better because after everything is sewn onto the block, it is also already quilted!
Sorry, Suelaroo, I haven’t put that quilt together yet. One of the many things on my to-do list!
60 wt holds? I’ve been taught that 40 wt was for quilting, 50 for piecing and 60 wt for applique and where ever you don’t want the thread to show. I have lots of 60 wt that I would love to use but always thought it would break after time.
Lily, according to Superior Threads, Bottom Line is suitable for “any kind of sewing.” I haven’t been using it long enough to tell you from personal experience how well it wears. But it was developed by Libby Lehman, who is a really experienced and well-respected quilting teacher. My sewing machine dealer recommends 40 weight Aurifil cotton thread for piecing. I was machine quilting, so I used Superior’s So Fine 50-weight polyester on the top, and Bottom Line 60-weight on the bottom. For anyone who is puzzled by all these numbers, the higher the number, the finer the thread. 60- weight is thinner than 40-weight. 30-weight is a pretty hefty thread for quilting. I use it when I want to give a hand-quilted look.
Thanks ! I would like to try backing with it so I searched out your tutorial….very helpful
Karen, I’ve found that the main challenges with polyester fleece are (1) it’s stretchy. Spray basting your quilt helps fix the fleece to the top so the stretching doesn’t cause puckers. And (2) fleece can drag against the sewing machine bed when you are sewing it. For this, the best solution I’ve found is to work in smaller sections, rather than trying to quilt a whole big quilt at once. Good luck with your quilting!