Cheesecloth Ghost Quilt for Halloween — Tutorial
 Around our house, we believe that you can never have too many Halloween decorations. I didn’t actually finish this little ghost quilt until the day after Halloween, but I’m posting the instructions so that if you want to make one, you’ll have a real head start on next year! If you concentrate, you can get the whole thing done in a couple of hours.
Supply List for Your Cheesecloth Ghost Quilt
The quilt size is 21″ x 17″.
Here’s what you will need:
- Three fat quarters of coordinating dark or spooky-looking fabrics for the quilt background.
- One fat quarter of backing fabric.
- 15” x 5” piece of coordinating fabric to make a hanging sleeve.
- 22” x 18” piece of thin quilt batting.
- ¼ yard binding fabric
- 3/4 yard white cheesecloth
- White and dark quilting thread
- Sewing machine with free motion capability
- Rotary cutter and ruler

Make the Quilt Background
The easy three-part background I used for this quilt originally came from the book Quilts from Larkspur Farm (Martingale & Company, 2002, ISBN # 978-1564773845.) You could easily substitute a single piece of Halloween-themed fabric instead, which makes the quilt even simpler to assemble. To make a three-fabric background like mine, follow these steps:
1. Cut the following pieces of fabric:
- 15” tall x 18” wide rectangle of a dark, spooky-looking fabric.
- 3” x 18” strip of a coordinating fabric.
- 4 ½” x 18” strip of a second coordinating fabric.
2. Sew the three parts together and press.
3. You’re now ready to layer the quilt sandwich. Put the backing fabric right side down, then the batting layer, and finally the quilt background, right side up.
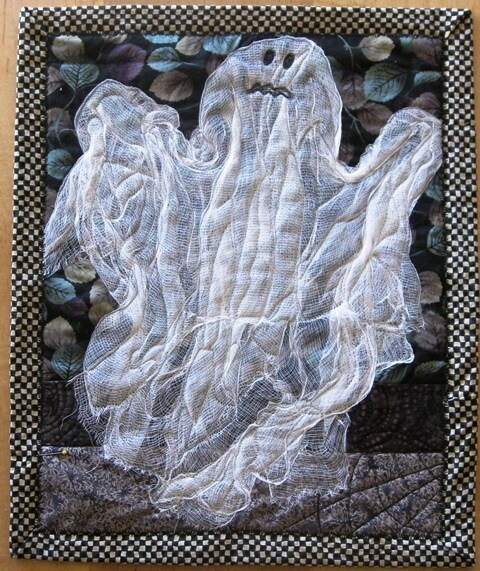
Make the Cheesecloth Ghost
- Cut a piece of cheesecloth anywhere from 18 to 24 inches long and the full width of the cheesecloth.
- Arrange the cheesecloth into a ghostly shape on the background fabric. The ghost looks best if you leave lots of folds and wrinkles in the cheesecloth. These create an interesting transparent depth.
- Press the cheesecloth flat with a steam iron set to “Cotton.”
- You might want to pin the cheesecloth in place for the next step, but I just went ahead and free-motion quilted the ghost without trying to baste it or glue it to the background at all. It worked beautifully!
- Free-motion stitch the cheesecloth to the quilt sandwich. Stitch all around the outer edges of the ghost, then stitch along the lines created by the folds and wrinkles to secure them in place.

Add Eyes and Mouth
The ghost’s eyes and mouth can give it a scary expression or a cute one. I tested little patches of black fabric, but thought they looked too opaque, so I used a dark thread to free-motion embroider the eyes and mouth instead. When I make another one, I think I would use grey thread instead of black and make the eyes quite a bit larger.

Add Free Motion Quilting
This quilt is small enough that you really don’t need to do any quilting beyond securing the ghost figure. I added this free-motion spider web just for fun.
Once you’ve finished quilting, square up the quilt, then add binding and a hanging sleeve. And you’re ready to haunt!