Quilt Label Ideas: How to Design and Create a Label

Your quilt is almost done! You see the finish line ahead. Do you really want to take the extra time to put on a quilt label now? Absolutely.
In just an hour or two, you can create a permanent record that your quilt will carry with it as long as it survives. A good quilt label will identify your quilt and help tell its unique story to generation after generation. Anyone who receives, buys, or uses it in the future will thank you for recording the unique facts that make your quilt a bit of living history.
This post covers quilt label ideas you can use in the next quilt you make.
Essential Information to Put on Every Quilt Label
What information should go on the label? You can stick with the basics, or create a label that’s a miniature work of art in itself. The basics give enough information about the quilt that someone who finds it in an attic a hundred years from now will be able to see its place in history:
- Your name (and the name of the person who quilted it, if you had it quilted by someone else).
- Date.
- Your city, state, and country.
Optional Items to Include
- Phone number, street address, and/or email address for yourself or recipient. If the quilt gets lost, these specifics could help you get it back.
- Recipient’s name and a suitable inscription. See a list of gift quilt sayings for all occasions that will fit perfectly on a quilt label. This label went on a thank-you quilt given to people who helped the quilt maker’s lost dog:
- The story of this quilt. You can tell how and why you made it, names of the quilt blocks or pattern you used, and any adventures you had getting it finished. We love the way Gay Lynn Hastings used this label to show how proud she was of making her very first quilt:
- Washing and care instructions. This is vital if the quilt needs any kind of special handling. Here’s an example by normanack:
Six Ways to Make a Quilt Label
There are lots of different ways to label a quilt. Here are some of the most popular:
- Hand write it with permanent ink. Write directly onto a rectangular piece of fabric or even on the quilt backing with a fine-tipped, permanent marker. If you write on the backing, test first to make sure it doesn’t bleed. Sharpie or Pigma pens are both widely used. Here’s one in colored inks, photographed by Melissa Gutierrez: And another in black and white:
- Embroider by hand or machine. I discovered that you can buy all kinds of custom-made quilt labels on Etsy. Here’s one that was machine embroidered with the name of the quilt guild that made the quilt. Or you can embroider your own. Here’s a very beautiful set of hand-embroidered labels:
- Use a computer and ink jet or all-in-one printer. You can design a custom quilt label using any computer graphics program, including any photos, special fonts, or any graphic elements you’d like, then print the label on a pretreated printable fabric sheet. You can find printable sheets at any quilt shop or large craft store. Many brands are available, such as Miracle Fabric Sheets, Vintage Workshop, and Color-Plus Pre-Cut Fabric Sheets. It’s also possible to make your own printable fabric sheets and print the label on them.
- Put the label on an extra block left over from the front of the quilt. Here’s a mini-block label that coordinates with the quilt’s fabric:
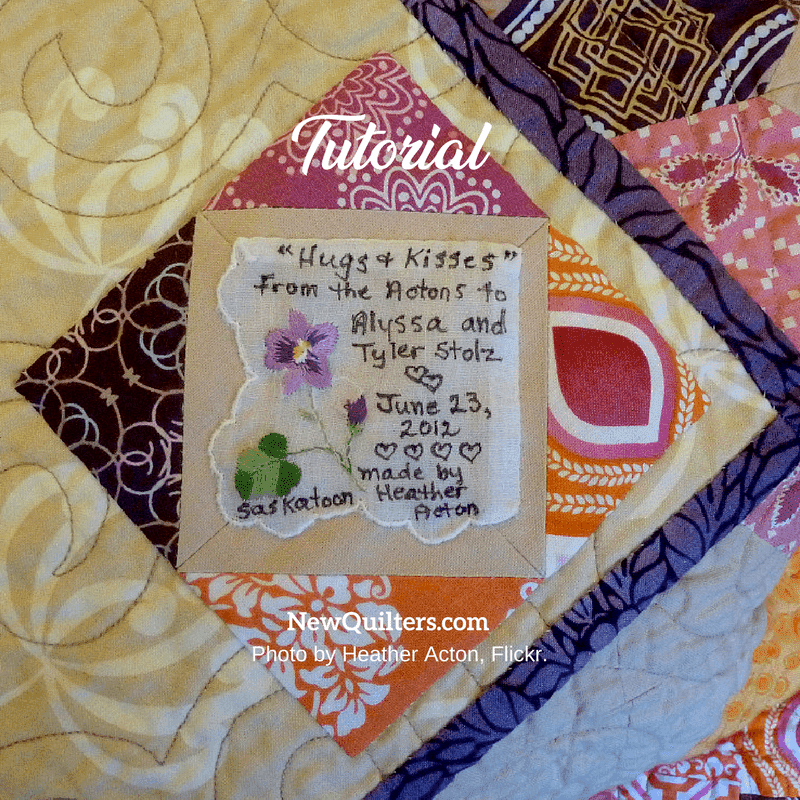
- Use a vintage linen doily or handkerchief. Write the quilt details on the fabric with a permanent fabric marker. Here are two we really like, by Heather Acton:
How to Sew the Label to the Quilt
Most of the labels I see are stitched to the quilt backing by hand, like this adorable baby quilt label photographed by Moose Mama on Flickr:
You’ll want to place your label somewhere that it won’t show if the quilt is hung up on a wall or laid out on a bed. Many quilters like to put it on the bottom right corner of the quilt’s back side. To discourage a potential thief from removing the label, sew it firmly to the backing fabric before you assemble the quilt, then you can hand- or machine-quilt right through the label.
Another suggestion I’ve read (but haven’t yet seen in real life) is to make a triangle by folding a fabric square in half. Write the label information on the triangle, then bind the triangle right into the corner of the quilt, the way you would to make a quilt hanging triangle. You may still want to whip stitch the angle of the triangle so the label doesn’t catch on anything as the quilt gets used.
Article originally published March 13, 2011. Revised and updated May 6, 2017 and February 15, 2018
I ran across your quote post while looking for cute quotes, then linked over to this post. I want to thank you for some wonderful ideas. For anyone interested in creating their own handmade labels, I found a great series of tutorials on the Missouri Star Quilt Co. on YouTube. A lady named Amy Latta takes you through the whole process, lettering and all. That was very helpful too.
I’m going to use waste canvas for counted cross stitching my label.
How do you make your own computer-printable fabric?? I have not had much luck with purchased printable fabric holding onto the ink through washings, and that makes it difficult to label baby quilts.
Printable fabric sheets are easy to use in an inkjet printer, but I have never been happy with their image quality. They tend to start out faded looking. A permanent but pricey solution is to buy a custom embroidered label on Etsy. You can get whatever words you like embroidered to the label, which will then definitely be permanent. Worth it for a special label.
Hand-printing with permanent ink also holds up well over time.
Thanks for all the great info!
So funny- I just made a Very Hungry Caterpillar quilt and I see your label with it!!!! Great ideas…..
I found stretching my label fabric on a needlework hoop keeps the fabric nice & taut to write on .I use a large per piece of fabric & then cut size I need .I sometimes add a small border .
Great idea, Paula. Thanks!
I find that ironing the fabric to the shiny side of freezer paper stabilizes to write.
I will leave the zip code off. LOL
When I make baby quilt labels I provide the name, weight, time & date of birth on a patch that matches the quilt. This patch is then made into a pocket to be used as a “Tooth Fairy” pocket. A tiny pull string gift bag is tucked in the pocket ready to be used.
Wonderful suggestion, Linda. I think we’ll add that to the blog post. Thanks!
Fabulous idea!!’
I like this post! Wonderfull ideas, I am going to make my first label ever for my first quilt.
Wonderful, Ramona! If you haven’t seen it, you might want to check out our list of sayings and quotes for quilt labels.
I love your label ideas. You might suggest that you can iron your label material to the shinney side of butcher paper before you try to write on it. It keeps your fabric sturdy as you write with the permanent marker and can be easily removed when you are done writing.
That’s a great suggestion, Bonnie, and one I haven’t tried for hand writing. I’m going to try that the next time I make a quilt label. Thanks!
Is it possible to use a Sharpie and write my own message??? Many Thanks.
Yes, of course you can write your own. Just make sure that (1) the pen you use has truly permanent ink, ink that will survive washing and won’t bleed on the rest of the quilt; and (2) the point is fine enough so you can write clearly. The Sharpies around my house have points that are too thick for writing on a label.
I write on fabric with a Pigma extra-fine-point pen with black ink. I’ve seen the suggestion that if you have trouble writing on a woven fabric, you can iron a piece of freezer paper onto the back of the fabric to make the fabric firmer. I haven’t tried this myself, but it sounds like a good idea.
Updating my reply to add that I just used a pen to write a quilt label and found that it really helped to tape the label to my work table with blue painter’s tape. This held the label taut while I wrote on it, and made writing the label much easier.
I use steam-a-seam light. I can attach it easily with that before quilting.
I just found your website and am particularly interested in making my own labels for my quilts. You have some wonderful ideas.
Thank you, Karen! There are lots of tutorials here on different aspects of quilting. We hope you will look around and find more you like.