How to Sew Churn Dash Quilt Blocks

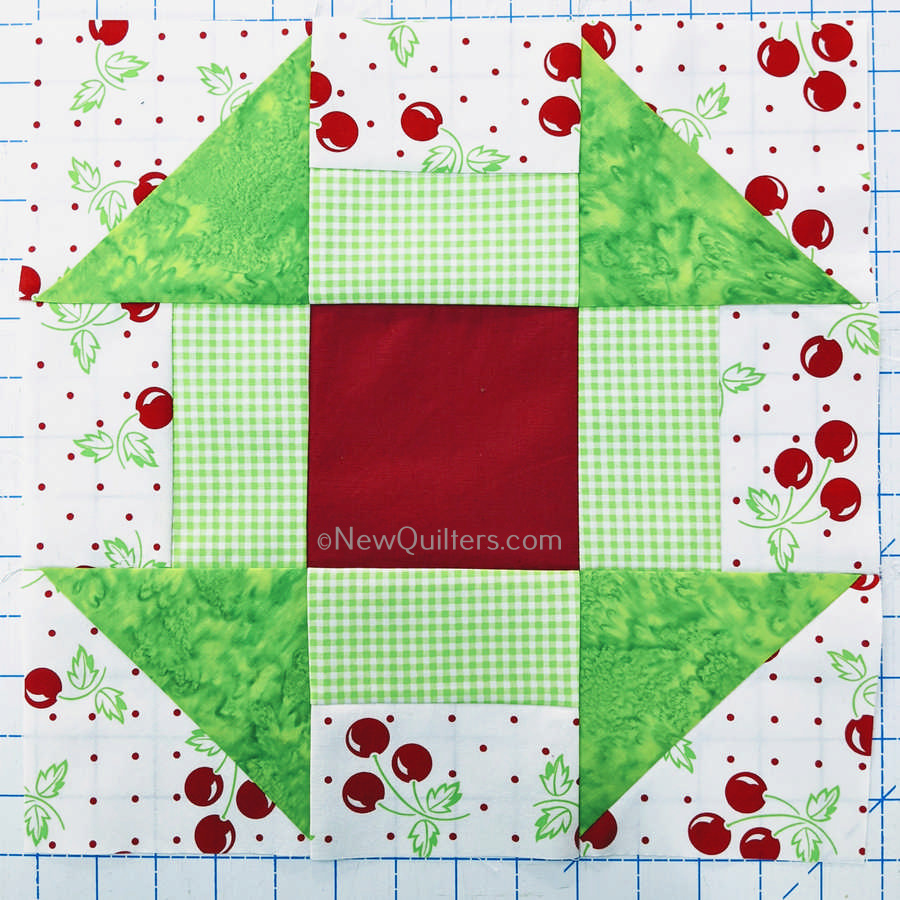
The Churn Dash quilt block is a traditional quilting favorite and a kissing cousin of the simpler Shoo Fly Block. Like Shoo Fly, Churn Dash belongs to the fabled Nine Patch quilt family. This means the block is made on a grid of nine squares , arranged in three rows of three. The only difference, in fact, is that Churn Dash includes rail fence blocks in four places where a Shoo Fly block has squares.
This tutorial shows you how to make a 13-1/2″ Churn Dash quilt block (finished size 13″) by combining squares, half-square triangle blocks, and rail fence blocks.
Fabric You Will Need
Making the Half-Square Triangles
You’ll need four half-square triangle blocks to make a Churn Dash block, and you can make them all at once with this clever time-saving method. (No marking needed, either!)
- Lay the two 8” squares together with their right sides facing each other. Carefully align the corners and edges.
- Sew a seam around the outside of the squares, using a 1/4” seam allowance.
- Cut the squares diagonally in half twice.
- Carefully press the triangles open. The edges are cut on the fabric bias, which means they are very stretchy, so take care to press them with vertical movements and avoid moving your iron from side to side, which might stretch them out of shape.
Trimming the Triangle Blocks
- The triangle blocks need to be trimmed to 5” square before you sew them into the larger block. This is easiest to do with a square ruler that has a 45-degree line marked on it.
- Put the ruler on top of the block. Align the 45-degree line with the diagonal seam line at the center of the block. Align the 5” markings on the ruler at the bottom corner of the block. Make sure the 5” lines are completely on the fabric.
- Trim off any extra fabric on the top and right edges of the block.
- Rotate the block 180 degrees and trim the other two sides.
Sewing the Rail Fence Sections
- Start with the 20″ light and dark strips. Lay them together with their right sides facing each other.
- Sew the strips together along one long side, using a scant ¼” seam.
- Press the strips, pressing the seam allowance to the side of the darker strip.
- Cross-cut the strips into four 5”-long sections.
Now you have all the pieces you need to sew the block together.
Assembling the Block
- Lay out the squares, rail fences, and triangle blocks as shown here.
- Stitch each row together.
- Press the seams in each row so the seam allowances at the places where the seams mate face in the opposite direction from the seam allowances in the next row. This will help you nest the seams so they look good when you sew the rows together.
- Sew the three rows together. I always pin at all the points where seams join before I sew.
- Press the block and square it up. (This one hasn’t been squared up yet.)
Your Churn Dash block is now ready to sew into a quilt!
Variations on the Churn Dash Block
The block I made for this tutorial has four different fabrics in it, but you can make a simpler Churn Dash with fewer fabrics. Here are some charming two-fabric examples made by Heather Acton: You can also make a scrappy Churn Dash like this one by Heidi Elliott:
Or use a fussy-cut theme square in the center, as Maria Johnson did with her block:
The possibilities are endless!
I just love your tutorials !!!! I am a new quilter and find great inspiration!! I look forward to your emails!! Love it!!!
Thank you, Mary Ann! This is the kind of comment I love to get!