How to Sew a Perfect Quarter-Inch Seam for Quilting

Psst! Don’t tell the Quilt Police, but sometimes I’ve had trouble making my blocks come out the right size. How about you?
Do any of these sound familiar?
- Your quilt blocks end up a bit too small.
- The points of your stars or triangles get chopped off at the tips.
- The seams on your quilt tops don’t line up perfectly with each other.
What’s going wrong?
If your quilt blocks and tops don’t always turn out the right size and shape, one of the first things to check is your seam allowances. Seams that are just a whisker larger or smaller than a scant quarter inch can cause you a lot of trouble. (I know this from experience.)
If you can learn to sew a consistent quarter-inch seam, your quilt blocks will turn out the right size every time, and your rows will fit together perfectly when you assemble the blocks into a quilt. After years of giving lip service to the concept of perfect quilter’s seams, I decided to test my accuracy and walk my talk today.
Seam Allowance Definitions
The seam allowance is the distance between your line of stitching and the raw edge of the fabric you’re sewing. One-quarter inch is the standard seam allowance used in almost every quilting pattern. Experienced quilters often advise beginners to try for a “scant” quarter-inch seam—a seam allowance that’s just a thread or two less than a quarter-inch.
Why Do You Need a SCANT Quarter-Inch Seam?
If your seams measure exactly a quarter-inch from the stitches to the edge of the fabric, your blocks will come out just a tiny bit too small. This happens because when you press a seam after sewing, the top layer of fabric is folded over to one side. This makes the block shrink slightly. The more seams in your blocks, the more shrinkage you’ll experience. This can cause real problems when you assemble a bunch of blocks into a quilt top. Leaving a scant seam allowance is most important when you make complicated patterns with lots of seams.To compensate for the shrinkage and make sewn blocks come out exactly the right size, you’ll need to use a seam allowance that is just a hair under a quarter-inch.
How to Achieve Consistent Seams
Here are some suggestions for making your seam allowances come out the same size every time. No matter which method you use, you should still test your results to make sure you aren’t off by a hair in one direction or another. (More on that below.)
- Use a quarter-inch quilting foot. Most sewing machines today offer a special foot with a built-in guide that helps you sew an exact quarter-inch seam. Not all machines have them. My fancy but finicky Pfaff 2140 has a quarter-inch foot accessory, but the Brother 1500s I now use for almost all my piecing doesn’t have one. So it’s option 2 for me!
- Create a seam guide on your sewing machine. I find this technique helpful even when I’m sewing with a quarter-inch foot. I can run the guide well out in front of the needle to help me align the fabric as I sew along. To create a guide, you will need a way to mark your sewing machine bed. The ideal seam guide is thick enough to make a little lip that keeps your fabric in place as you feed it into the machine. Some options I’ve seen here and there around the web:
-
- Marker line drawn on the machine bed
- Stack of blue painter’s tape. This is what I use. I stick several strips on top of each other to create a bit of an edge to align my fabric. Here’s the blue tape guide on my sewing machine.
-
- Thick foam tape like a Dr. Scholl’s foam bandage
- Piece of flexible cardboard taped to the machine bed
- Stack of Post-it notes
- Thick rubber band fitted around the sewing machine’s free arm (if your sewing machine has a free arm.) Thanks to reader Sue Hamner for this suggestion.
- A commercially available sewing guide that you can buy at quilt shops or fabric stores. Dritz makes a magnetic seam guide which is supposed to work on any machine. I’ve also seen an adhesive seam guide from Collins that comes with a little measuring device for pinpoint accuracy. I’m leery of using magnets on my electronic machine, so I prefer adhesive to magnetic.
- A piece of weatherstripping foam. The thickness of the foam creates that little ledge that helps keep your fabric in proper alignment. Use the sticky side against your sewing machine bed. It is easy to remove when needed. Thanks to reader Mary Sloan for this suggestion.
How to Locate Your Seam Guide Accurately
Accuracy is the word here, so you’ll need to do a bit of measuring.
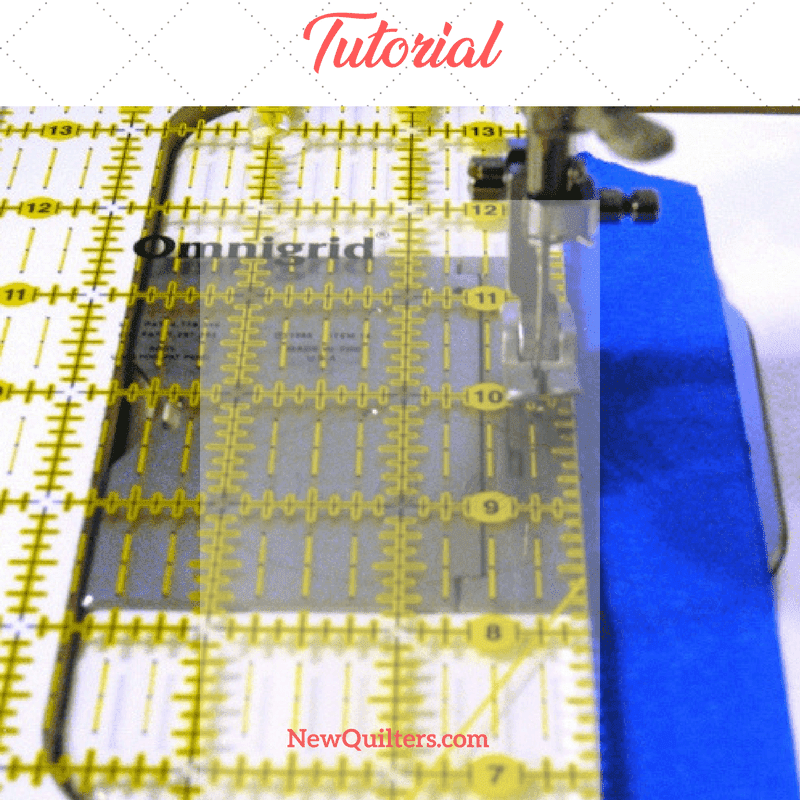
- Put a see-through cutting ruler under your sewing machine’s presser foot and lower the needle until it touches a spot just a hair to the right of the quarter-inch mark closest to the right edge of the ruler. (You can also use a piece of graph paper and touch the needle to the first quarter-inch mark on the right side of the paper.)
- Using the right edge of the ruler or graph paper to align your tape or sewing guide, stick the guide on the machine bed just in front of the feed dogs. You don’t want the guide to interfere with those dogs!
- Run your fabric along the edge of the guide when you feed pieces under the sewing machine needle.
How to Test Quilt Seam Allowances for Accuracy
No matter what method you use to align your seam, you should check yourself with this quarter inch test.
- Cut three short, 1½”-wide strips of fabric like this:
- Sew the three strips together.
- Press the seams to the sides, then measure the center strip. It should measure EXACTLY 1”. If it is narrower or wider, adjust your seam guide and retest, then check again.
I decided to test the painter’s tape seam guide I was using on my sewing machine. I sewed the three strips together, pressed them, and measured. On the first try, the center strip measured less than 1 inch. It was TOO SMALL.
I moved the tape a bit closer to the sewing needle and tried again. This time, the center strip was TOO BIG. I had moved the seam guide too close to the needle.
On try #3, I got the center strip JUST RIGHT. Now my seams and my blocks should come out the right size.
The test didn’t take long at all — about ten minutes total. Why did I wait so long to do this? Readers, I challenge you to try this test yourself and let me know how it turns out.
Sewing machines seem to be designed to fight you against making that perfect quarter inch seam allowance. Neither of my two Brother machines, nor my BabyLock, have a needle position where the rightmost feed dogs engage the fabric stack when sewing a 1/4 inch seam. The BabyLock (Jazz II) advertises itself to be a quilting machine – and it does that beautifully, except for this one flaw – the machine fights me every step of the way to getting that perfect 1/4 inch seam allowance. Maybe the world would be a better place if we changed that 1/4 inch standard to being 1/3 of an inch, or, dare we, 1/2.
It seems like high time for American sewing to go metric, too, but I’m not holding my breath. I do wish sewing machine makers would make better 1/4″ feet that would really guide the fabric so the seam allowance is a perfect scant quarter inch.
Thanks! Very helpful and I appreciated you explaining different ways to achieve the same goal.
I have a machine where I can adjust the needle position and this is what I have found to be the easiest way to make sure I get it 1/4”
Me too, Elizabeth! I also really count on the 1/4″ foot with a little guide on the right side.
Just got your book today and I’m really enjoying it. Does the basting spray ever cause a needle to have problems ir cause stitches to not be uniform? Just wondering about using it. Thanks fir the pillow pattern and the labels in the book❤️
Hi Jodie,
Glad you like the book! I have occasionally gotten a little gooey stuff on a needle from basting spray, but it’s easy to wipe away with a tissue or even with your fingers. It’s nothing I worry about.
If I stack some pieces of tape for when I’m piecing, do I need to remove them before I start quilting? Or can I leave them there? Seems like it wouldn’t let my fabric glide very easily. Thank you
Thanks for the question, Candice. Yes, you should remove the seam guide you made for piecing when it’s time to machine quilt. As you guessed, having the seam guide would interfere with the movement of the quilt sandwich when you’re trying to quilt it.
I do have a sew easy foot that came with my new machine, but have used a rubber band in the past before with a machine that did not have one. I put it across the free arm and taped it down on the underside of the machine. when I needed to change the bobbin, I pulled the rubber band off, leaving the taped side attached to the machine, the. just reattached the band to the machine when the bobbin was changed.
I use a popsickle (sp) stick glued to my sewing bed. Just use school glue so it doesn’t damage and can be easily removed then replaced!
I’ve never heard that one before, Elizabeth! Thanks for the tip.
It was helpful when you talked about how to locate our seam guide accurately. I want to buy some Hawaiian fabric to make a quilt for my niece. Following your suggestions should help me make a high-quality quilt!
I’m new to blogs, but have been quilting for 25 years. Found the blog interesting and fun to read.
Thank you, Holly!
Thank you so much for this tutorial it really helped me when I started to learn to quilt. You explain things so clearly. I have recently started an absolute beginner’s blog and would like to include a link to your tutorial. Would this be okay with you?
Kind regards,
Allison
We appreciate the kind words, Allison.
I have trouble ending the pieces. They are either wider or narrower on the last few stitches that I can’t see as they go through the machine.
I’ve had the same problem sometimes, Agnes. You might try guiding the blocks under the presser foot with a stiletto, which you can safely get closer to the needle than your fingertips. Another technique that helps you keep straight is chain piecing.
Me too. Any suggestions. I usually use dr. Scholls cushion tape. Problem I have is I have to remove it every time my bobbin runs out.
I hate to fall back on this, but practice always helps me get better at accuracy. So does chain piecing, or piecing a group of blocks or sections at once. I also have to remove my seam guide when I change the bobbin, and it IS quite annoying, but I don’t have a better idea!
Judy I to had that problem, I used a sharp blade to slice the guide that is on the bobbin in front and in back if the cover this way I still had my full guide but could change the bobbin with ease. Hope this helps
Eileen
quilts1130@yahoo.com
I have been a quilter for 25 years made some beautiful quilts! I was diagnosed with MS 23 years ago and quilting has been the best therapy for me. Then about 10 years ago my legs and arms quit working bad! I use to work as an office manager, I was super fast typist along with calculators. Now I have to hunt and peck. I know I’m rambling on and on but quilters are my best friends! I have 3 chairs in my sewing room 1 at sewing machine, 1 at ironing board, & 1 at table that I cut at. I recently bought an accuquilt cutter because I have so much trouble with cutting. I was beginning to think I was going to have to give it up and that made me cry! I use painters tape now for my 1/4” seams now. Y’alls comments & helpful hints help me so much! Thank all of you so much! Keep up with them!!
I
Thanks for your kind words, Kayla. Please come back and let us know how the Accuquilt is working for you. I know a lot of other people have trouble with pain caused by cutting, and would like to know if a cutting machine is a good solution.
I also got an Accuquilt fabric cutter and it is a dream. I splurged on the electric model GO Big because i could see cranking it would also cause fatigue in my hands. I have a Double Wedding Ring quilt already cut out and ready for me to sit down and start.
I’ve had my eye on the Go Big for some time. It sounds like a wonderful time saver. I’ve been nervous about fabric waste, which is ridiculous since I have so many scraps in my sewing room already!
You should be able to use up your scraps, and still manage with minimal waste/loss. Very easy to use, and laying the fabric on the dies by following the bias you can save even more of the fabric as you learn how best to approach the specific dies you are using. You can line the fabric up against the edge of the die, it doesn’t have to overlap more than a few threads. It cuts very precisely. Depending on the different fabric weight you can cut more or less than 6 at a time. I have some batiks from Timeless Treasures that are so light (but not transparent) I was able to cut 10 at a time. By then I finished the cuts for my needs so I didnt try cutting more layers.
Thanks for the encouragement. As it happens, I just borrowed my friend’s Accuquilt Go to cut a bunch of circles for a rag quilt pattern I’m working on, and tonight or tomorrow morning it will see action. Wish me luck!
I also have MS diagnosed 2015 at the age of 62. Quilting has been great therapy for me also my problems are my eyes and because of some bugling disk in neck ( horse back riding and showing in my 30 and 40’s ) I have numbing in my left hand and guess what I am left handed I have stared machine binding my quilt but I keep going with it
I’m left-handed too, Kayla, and it makes everything more complicated, doesn’t it? I hope quilting continues to help you. All my best, Christine.
I’m with you Kayla. Each day I have to puzzle out ways to get around things, but my disease is sciatica with nerve damage in my legs. (And diabetic and rheumatic)I love sewing , knitting etc. Keep the faith. I find my situation to be ironic because Ì was a special needs teacher. I often think about my years teaching.
Thanks for this site and the ideas.
I am so happy in finding this site and reading all of the comments.
I too use many layers of painters tape. I found a 4″ ruler with holes for the needle. It measures 1/4″, 1/2″, + 5/8,& 7/8. Best thing sense sliced bread!
To Jill
Could you please take a picture your special ruler and post it.
Would appreciate seeing it.
Va.
I just want to reply to Kayla. Just like you, Kayla, I had problems with my health. Just one year after I retired from 29 years of nursing. At age 59 I had 2 strokes at the same time. Both were near fatal. One affected my right side and one the left. I shouldn’t have lived, but I did. I couldn’t do anything, walk, talk, sit up, eat, spell, write, nothing. I had to learn how to do everything all over. It was hard work, had no interest in depression, or self pity. I finally came home, but boy was it hard on my family. After a couple of years I found I could use my iPad. Games, puzzles, then I discovered Pinterest, and quilting sites. My mother had always quilted, but I didn’t. I started to sew quilt tops and all kind of things. Tutorials were my friends, and all the teachers were so patient and kind. I have many friends, and they don’t even know it. I’m rambling too, but I just wanted to let you know you are not alone. I can do just about anything , I have to do a little at a time. Thanks to all who have helped me. I am so blessed.
Becky
Thank you so much for the encouragement, Becky. I know a lot of people who visit this blog have dealt with serious health problems and many have found joy in quilting.
I use weather strip it is sticky on one side and just thick enough to keep fabric from moving over the edge. Easy to remove if a larger seam is needed
Great idea! I’ve never heard that one before. Thank you for the tip, Mary.
I am a retired English teacher and a visual learner, so your tutorial is a Quilt-saver for me! This trick should be an intro to all quilting seminars. Can’t wait to put the marker in place, the tutorial nearby, and SEW away.
Happy quilting, Mary Lee!
Excellent advice, Felicity. I have taught quilters kindergarten for years. My student are always grateful (down the line) that I forced them to master the scant quarter seam first.
Yes, the fundamentals never go out of style.
What about attaching a small ($6) laser light to your machine aimed at a scant quarter? I used double stick Velcro.
Good idea, Ginny. I’ve tried using the laser to create a line for sewing the center seams in a half-square triangle block, but I haven’t mastered the art of placing the laser on my sewing machine head. I’ll have to give it another try.
What kind of laser did you get and where did you purchase it?
I got my laser from Harbor Freight, Andi, but I’m afraid I don’t remember the brand name. You could find it by searching “laser light for sewing machine”, I’m sure.
I have a top loading bobbin with a little plastic door that I have to pop off to refill the bobbin, so i cant put anything over it. It’s hard to get the 1/4 seam for me.
I also have a top-loading bobbin with a clear plastic lid, but I find I can still put a painter’s-tape seam guide on the right side of the seam allowance without interfering with the bobbin. If that’s not possible for you, that’s a real shame! You’d think the sewing machine people could come up with a better bobbin design.
That isn’t too big of a deal for me even though it would require moving it each time I was sewing but i can’t even do that because it interferes with the feEd dogs!
If I put a piece of tape at the 1/4″ mark, it just barely clears the feed dogs. It’s a shame you can’t do it on your machine.
My Elna is the same. I used the painters tape trick and then using an exacto knife, I scored down the seam of the plastic drop in bobbin cover. Works fine.
Thank you!! Now my 12 & 1/2″ blocks should be 12 & 1/2 and not 12″. Drove me nuts!! Lol. Now to learn how to cut accurately.
Thanks, Rebecca! Cutting is a real challenge for me too. One thing that has really helped me is using a slotted ruler for cutting. See our post on how slotted rulers help you cut more accurately. Best of luck!
Thank you! My two biggest issues are the 1/4 inch seam allowance and thinking I did well but when matching up, it’s off. Also cutting accurately to begin with.
I am still working at both of those even after many years of quilting. Some people are just born with that precision gene, and others of us have to keep improving slowly over the years.
When you have to change the thread , you then have to remeasure correct?
Thanks for the question, Barr. Yes, I would remeasure when I change the thread — any time you lift the presser foot, you can introduce changes. Best to meausre again just to be sure.
I bought the Dritz magnetic seam guide, it was so strong it moved my bobbin and machine wouldn’t sew correctly. Once I removed the guide, my machine worked fine.
Wow, that’s not good! I have an electronic machine and wouldn’t dare put a magnet anywhere near the motherboard. Sorry you had that experience. Maybe a few layers of trusty old blue painter’s tape layers are a better solution.
I made my own clothes in high school and didn’t sew much after that. When my son and his girlfriend decided to move to Berkeley, I whipped out a Disappearing Nine Patch top for them. I didn’t have time to send it out to be quilted so I quilted it row by row with block-size batting between the top and bottom layers. It turned out lovely and they love it.
That first quilt awakened a sewing sickness and I’m now turning out one after the other. Is there such a thing as QA?
Definitely there is a quilting addiction! I think most of us who visit this blog have it. Check out our quilting memes page for some fun on fabric addiction.
My first quilt was a cowboy quilt for a little boy. It was truely a learning experience because I had sewed for about 50 years but never quilted. I turned out fair but after close to 75 quilts later, I am really much more confident about my ability to put together something that I can say I am proud of.
Thanks for your story, Judy. So many quilters make their first quilts as gifts for another person.
Hi I teach sewing to all abilities and I make sure that my guys can handle hand sewing as well as sewing machines.
Re sewing by hand and keeping things straight and even .Try putting a mark on the side of your thumb to tell you what your ideal seam allowance should be.
I use white micro pore surgical tape for this or mark directly onto the skin if the persons willing .cheap and simple.
Thanks for that great idea, Helen!
They have a 1/4 inch tape to use on the edge of your fabric as a guide.
I found in the scrapbook section of my Joanns an adhesive grosgrain ribbon and it works perfectly as a seam guide. It’s thick enough that cotton quilt fabric will ride along the edge, and yet not too sticky when you want to remove it or enlarge the seam allowance for clothing construction
That’s one we’ve never heard of before, Laurie! Thanks for letting us know about it.
Glad to have helped, Erin.
I must try this, now to make perfect Block
I use a strip of moleskin to make an edge at the 1/4 mark. I never heard about using the scant 1/4 in. Thanks for the advice, my pieces should fit better knowing that.
Great idea, Polly! Moleskin has the thickness that really helps guide the fabric. I might steal some from my husband’s hiking emergency kit and give it a try.
I marked the quarter inch seam, then put a rubber band over the marking to give the lip. Works!!
Great idea, Sue!
I love this idea, because it’s easy to slide the band over out of the way when sewing other projects. Like seams down the middle of my 1/2 blocks. Just had trouble finding the perfect rubber band, had to fit pretty tight, and be thick. My granddaughter’s make perfect seams!
Hi Felicity
I had a lot of problems with my electronic machine not sewing properly and each time I took it to be tested it ran perfect and turned out that my magnetic pin holder that I had beside my machine was causing all the problems so after getting rid of it my machine now runs perfectly
Oh, Caroline! Problems like that are so very frustrating. I am really glad you found the solution. Readers, be aware that anything magnetic such as Caroline’s pinholder or lights that attach to your sewing machine with magnets or magnetic seam guides can cause problems for electronic sewing machines. I guess that’s an argument in favor of sewing with an old-style mechanical machine.
Very useful tip
No seriously, it really, really can’t be this simple… I almost feel like you are tricking ME!!! I am a FOURTH generation professional sewer, I gave dozens of aunties, cousins & nannys, and I have sewed for 40, yes, yes, 40 years, and I find this tiny little trick that has changed my life!
You deserve a Nobel Prize of some description, yes you do. I love you by the way, I think I’ll keep an image of you in locket close to my heart!
Aw, we’re blushing! So glad to have been helpful to you, Carol. I can’t tell you how much I wrestled with the perfect 1/4″ seam. I’m not one of those quilters who has an inborn gift for accuracy. But you can learn to be accurate even if you don’t have the gift already.
I STRONGLY advise against using the magnetic guide. I used the magnetic guide on two of my machines and it caused major problems with the metal bobbin shuttle jumping while I was sewing. To remedy this I had to stop using it for at least a week for all of the magnetic field to wear off before the machine would run normally again.
Thanks for that advice, April. I haven’t tried a magnetic guide myself. I have a fancy one on my new sewing machine, and before that I always stuck with a few layers of my trusty blue painter’s tape.
new quilter needs lots of help
Lynn, if you have any questions, send us an email or post a comment and we’ll be happy to help as best we can. Glad to welcome you to the world of quilting. It’s a wonderful world and a (possibly) all-consuming creative interest.
What about hand sewing??
Sorry, Peggy, I guess our pro-sewing-machine bias is showing! I just looked for articles about seam allowances for hand quilting and came up empty. But I am guessing that you can mark your seams with a ruler and a marking pen or pencil and just stitch along the line to achieve a neat quarter-inch seam on a hand-pieced block. On curved blocks this would be more difficult. Is anyone reading this who is a hand quilter?
You would have to use a very fine pointed pencil or a very fine pointed pen because if it you made it to thick you might not get your 1/4 inch seam right.
That’s an important point, Suzanne. Precise marking is key to precise cutting and sewing. (A lesson it took me years to learn!)