3 Ways to Sew Bear Paw Quilt Blocks — Tutorial

The bear paw quilt block is an old favorite that dates back to the days when real bears used to lurk in the woods around most towns, villages, and settlements. This tutorial shows you how to make three different variations on the bear’s paw block, each one featuring a really fast and simple raw-edged layering method for making the half-square-triangle “claws”. If you hate marking and trimming half-square triangle blocks (me too!), this method can save you lots of time. I like doing it this way because it just feels less fussy than laboriously piecing the small half-square triangles.
Skill Level: Beginner
Finished Block Size: 13-1/2″ x 13-1/2″ (34 x 34 cm)
The three variations of the bear paw block in this tutorial are:
- Version #1: A nine-patch bear paw made from 5″ charm squares.
- Version #2: A bear paw block with a single large square in the “paw” section of the block.
- Version #3: A bear paw block with a large half-square triangle in the “paw” section.
Tools and Supplies
- (Optional) Pinking blade on your rotary cutter . The zigzag edge cut by a pinking blade minimizes fraying on the raw edges of the half-square triangle blocks. You can also make the block using a regular rotary cutter blade, though.
- Quilting thread in a color that blends in with your fabrics. I use a neutral beige or gray cotton Aurifil thread for piecing and a thread color that coordinates with the color of my “claw” fabrics to make the layered half-square triangles.
Fabric You Will Need
Version #1: Nine-patch bear paw block
This block is made entirely from 5″ charm squares. To make the paw and claws stand out, make sure there is a strong contrast between them and the background fabric. You will need:
- Five white or pale 5″ background squares
- Four 5″ squares for the “paw”
- Two 5″ squares in a coordinating color for the “claws”
Version #2: Large square paw
This variation is made from charm squares, plus a single large square that serves as the “paw.” You will need:
- Five white or pale 5″ background squares
- One 9-1/2″ square for the paw
- Two 5″ squares in a coordinating color for the “claws”
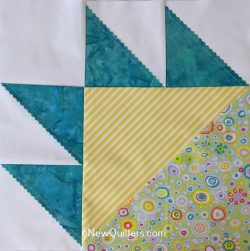
Version #3: Large half-square-triangle paw
This variation is made from charm squares, plus a single large half-square triangle that acts as the “paw.” You will need:
- Five white or pale 5″ background squares
- Two 10″ squares for the half-square-triangle paw. You will end up with one extra triangle block.
- Two 5″ squares in a coordinating color for the “claws”
Step by Step Instructions
Version #1: Nine-patch bear paw block
- Use your rotary cutter (ideally with a pinking blade) to cut the two squares for the claws diagonally in half.
- Lay each triangle on one of the background squares. Carefully align the corners and edges, then topstitch each triangle onto its background square. The photo below shows where to sew.
- Version 3 (Half-square triangle Paw) only: Use the two 10″ squares to make the half-square triangle for the paw. You can either use the raw-edge method described in steps 1 and 2, which yields one block, or make a standard pieced triangle block, which yields two triangle blocks. See my tutorial on piecing half-square triangle blocks. If you use this method, you can use the extra block to make another bear paw block, or save it for another project.
- Lay out the block, using the photos below as a guide. Use the photo for the version of the block you want to make. Each version of the block has a different layout.
Version #1: Nine-patch Bear Paw
I sew this block one row at a time, working from the top row to the bottom:
Press the seam allowances in the rows in opposite directions. This makes it easier to sew the rows together into a completed block.
Version #2: Large Square Paw
This version and Version #3 are sewed together in the same way:
1) Sew together the blocks in the top row.
2) Sew together the two remaining blocks in the left column.
3) Sew together the left column and the large paw block.
4) Sew together the top and bottom rows.
Version #3: Half-Square Triangle Paw
This version is sewed together the same way as Version #2. Scroll up for detailed instructions.
Once all the rows are sewed together, press the block, square it up, and you’re done!
Scrappy Bear Paw Table Topper Quilt
The bear paw block is the foundation for countless quilt patterns of all sizes. I made this simple table topper from the first bear paw blocks I made and used white 2-1/2″ jelly roll strips as sashing. The cornerstone in the center of the quilt is a 2-1/2″ square that I appliqued to the top of the quilt, leaving the edges raw. (It’s a lot easier than piecing the cornerstone into the sashing!)