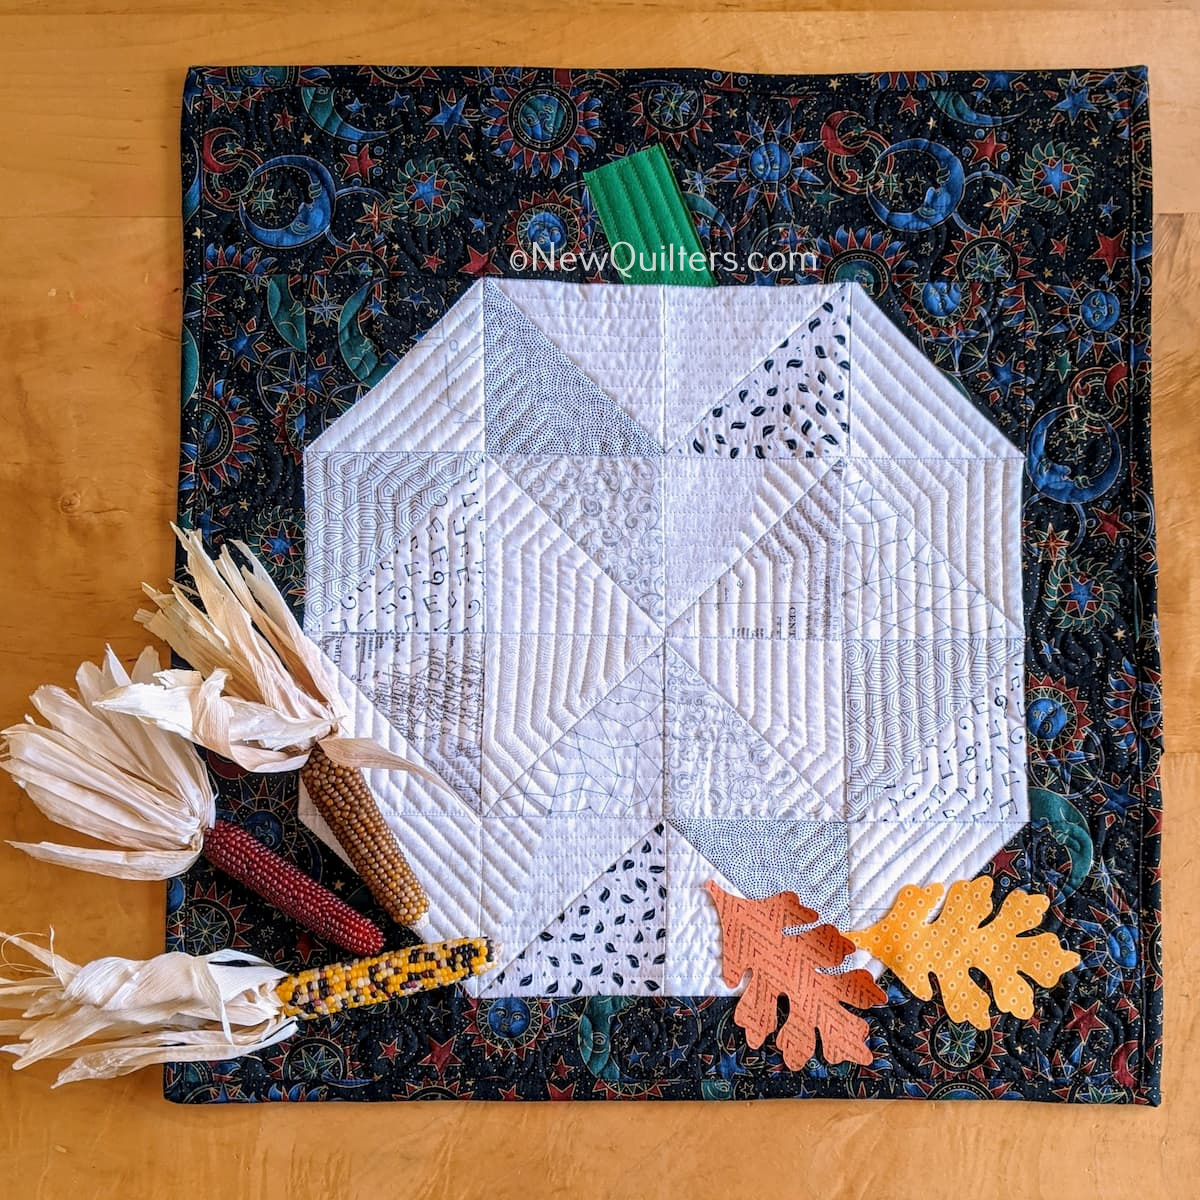
White Pumpkin Fall Table Topper Quilt

Quilt size: 23″ x 24-1/2″ (59 x 62 cm)
Skill level: Easy/Beginner
The original pattern and tutorial for this charming little table topper quilt comes from Lindsay Wright at the Fort Worth Fabric Studio blog. I thought it would be fun to make mine in black and white instead of the traditional orange.
I also enlarged the pattern so I could use some of my large stash of 5″ white squares instead of cutting smaller pieces, and appliqued the stem onto the pumpkin, instead of piecing it.
Fabric and Supplies
- Sixteen 5″ squares of assorted white prints for the pumpkin.
- 1/2 yard of background fabric. I used this black celestial fabric from Hoffman International.
- Cut the background fabric into one strip 5″ x 23-1/2″, two 5″ squares, two strips 3″ x 18-1/2″, and one strip 2-1/2″ x 23-1/2″:
- 1/4 yard of binding fabric, cut into three strips 2-1/2″ x the full width of the fabric from selvage to selvage.
- Green fabric scrap for the pumpkin stem. My scrap was 3″ x 5″.
- 3/4 yard background fabric, cut into one piece 27″ x 25-1/2″.
- One piece of batting 27″ x 25-1/2″.
- Wash-away fabric glue or fusible web to glue the pumpkin stem to the quilt top.
Step-by-Step Instructions
- Use twelve of the 5″ white squares to make twelve half-square triangle blocks.
Need help making half-square triangle blocks? Learn how to make them from fabric squares. - Use two 5″ white squares and the two 5″ background fabric squares to make four black-and-white triangle blocks.
- Trim the triangle blocks to 4-1/2″.
- Using the diagram below as a guide, lay out the triangle blocks into four rows on your work surface. Put the black-and-white triangles at the corners to form a pumpkin shape.
Pay special attention to how you place the diagonal seam lines in the triangle blocks. Lindsay arranged them to create interesting secondary patterns inside the pumpkin that add a lot to the interest of the quilt. See her original pattern for a diagram that shows this very clearly.
Once you have the blocks arranged in a way you like, go away for an hour or two, then come back and look again to make sure you’re satisfied with the layout. - Sew the blocks in each row together, then press the seams. I press each row so the seam allowances on the back sides of that row face in the opposite direction from the surrounding rows. This makes it easier to get nice-looking seam intersections when you sew the blocks together.
- Sew the rows together. Align the seams and pin them together at seam intersections.
- Sew the left and right borders onto the center section and press.
- Sew on the top and bottom borders and press.
- Layer the quilt top, batting, and backing fabric and smooth away any wrinkles. I don’t usually bother to baste a quilt this small.
- To add the stem, start with a rectangular(ish) scrap of green fabric. My scrap was a 3″ x 5″ rectangle left over from a pillow I made last Christmas. Slice off one corner to give the stem a jaunty, natural-looking angle, then fuse or glue the stem to the quilt top.
- Quilt the layers together. Here’s what I did:
* Sewed down the stem with simple straight seams and green thread in the needle and a black thread in the bobbin to match my backing fabric.
* Stitched in the ditch. I sewed all the seam lines in the white pumpkin section with white thread in the needle.
* Echo-quilted the pumpkin section. I started about half an inch from the outside of the pumpkin and worked my way in, using the edge of my presser foot to separate the lines of stitching. I sewed straight seams with white thread in the needle and my sewing machine’s walking foot engaged.
* Free-motion quilted the borders with a spiral motif and black thread in the needle, because I’m out of practice when it comes to free-motion quilting and didn’t want to draw too much attention to my wonky spirals. - (Optional) If you’d like to hang the quilt on the wall, add a hanging sleeve. I like to sew on the sleeve as part of putting on the binding.
- Make binding and sew it to the quilt. Here’s my favorite binding technique (no hand sewing!)
Here’s the finished quilt: