Autumn Leaves Wreath Quilt

If you’ve taken it for granted that the Christmas holiday season is the only time of year to make wreath quilts, I hope this little autumn leaf quilt will make you think again. I like making wreath quilts at any season, and every season has its own motifs that can be turned into wreaths. This easy little wall hanging (small enough to be used as a table topper) has a pieced background embellished with fusible applique leaves.
Quilt Details
- Skill level: easy. Simple piecing and applique.
- Finished quilt size: 27″ x 31-1/2″ (69 x 80 cm)
- Finished block size: 4-1/2″ square (11.5 cm square)
Fabric and Supplies Needed
- Forty-two 5″ charm squares in a variety of white, beige, black-and-white, light gray, or other neutral prints.
- Assorted red, orange, yellow, green, and brown prints to make the leaves. I used mostly large scraps or fat quarters I already had in my fabric stash.
- 1 yard backing fabric
- 1/3 yard binding fabric, cut into 4 strips that measure 2-1/2″ x the full width of the fabric, from selvage to selvage.
- Craft-sized package of a thin batting such as bamboo, wool, or cotton.
- Double-sided fusible web such as Pellon Wonder Under or HeatnBond from Thermoweb.
The background of the quilt is made from 5″ charm squares in a variety of neutral prints. I started using this scrappy approach to make quilt backgrounds a couple of years ago and find myself using it more and more instead of using a single large piece of fabric as the background.
Mixing up a bunch of neutrals makes the background look interesting, but not so interesting that it distracts your eye from the main wreath design. It’s also easy to find or cut your own charm squares, and I really enjoy sewing them together. (Straight line sewing, baby!) You can make a large quilt with this method just as easily as a small one: just add more squares.
For this quilt, I laid out the squares in a rectangle six squares wide and seven squares deep, then sewed the rows together using a scant 1/4″ seam.
Cutting out the Leaves
I cut the leaves with my Accuquilt cutting machine and several different leaf-shaped dies from my library of dies. If you don’t have a cutting machine, you can find lots of leaf templates online to print out and trace as patterns. Here’s a sample of popular leaf shapes to inspire you:
To cut out a leaf:
- Find a piece of fabric that is bigger than the leaf you want to cut.
- Cut out a piece of double-sided fusible web that is just slightly smaller than the fabric. Cutting the fusible be smaller than the fabric helps prevent glue getting on your iron or your ironing board.
- Put the rough (glue) side of the fusible web against the fabric’s wrong side, then use a hot iron to glue them together, following the manufacturer’s instructions.
- Turn the fabric/fusible piece so the paper side is face up on your work surface.
- Put the shape you want to copy on top of the paper, then use a pen or pencil to trace the shape.
- Cut out the shape with scissors or an Exacto knife. Shapes with simple edges are easier to sew than more complicated ones, so if your pattern has a very detailed edge you may want to smooth it out and simplify it a bit.
Layering, Basting, and Stitching the Background
I like to stitch the quilt’s background fabric, batting, and backing layers together before I add the applique. Here are the steps I take:
- Layer and baste the quilt top, batting, and backing layers. I like to spray baste, but you may prefer a different basting technique.
- Stitch the layers together. For a simple quilt like this, I use my sewing machine’s walking foot to stitch in the ditch along all the seam lines in the quilt top.
Laying Out, Ironing, and Stitching the Wreath
Once the background quilt sandwich is stitched together, you’re ready to add the applique leaves. I find it works best to place the leaves in several layers, ironing each layer in place and stitching it down before adding more leaves.
- Lay the quilt sandwich face up on your ironing board.
- You can arrange the leaves by eye, or draw a circle in the center of the quilt to help you create a pleasing wreath shape. I put a dinner plate on my quilt sandwich and arranged the center ring of nine maple leaves around it, then pressed the leaves into place. They made a circle around which I could arrange the rest of the leaves.
- Iron the leaves into place, following the fusible manufacturer’s instructions.
- Stitch the leaves to secure them. If you use heavier-duty fusible web, you could skip this step on a quilt like this that doesn’t need frequent washing. If you use lighter-weight fusible web, it’s definitely a good idea to stitch down the shapes in addition to ironing them to the quilt. The manufacturer’s instructions will guide you.
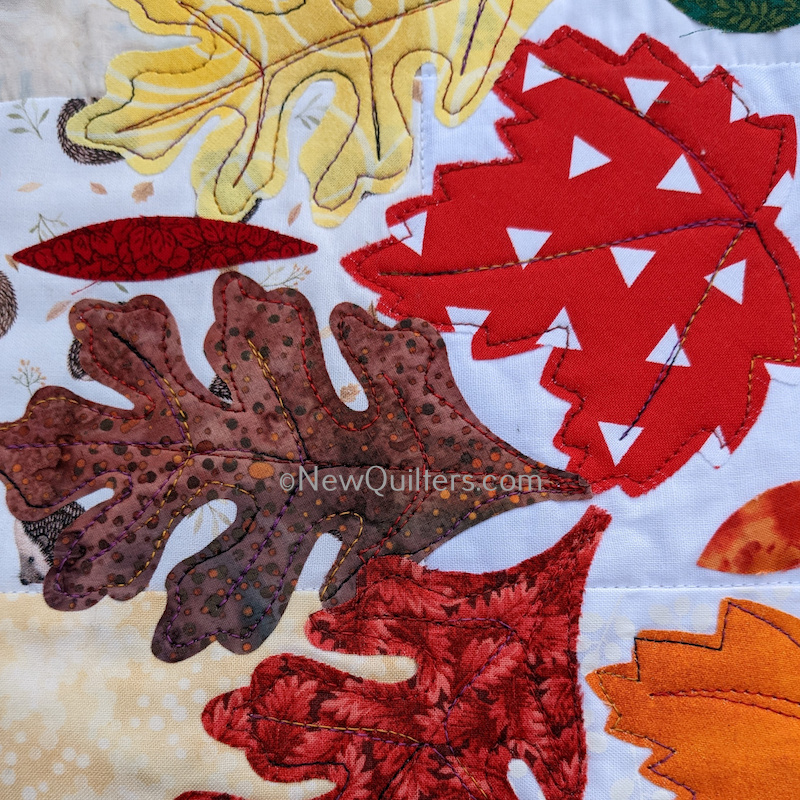
I used free-motion quilting around the edges of each leaf and to imitate the veins you see in real leaves. - Repeat the same steps to add the next layer of leaves. My second layer was a set of 18 oak leaves. The photo shows them before stitching.
- You could definitely stop with two layers of leaves, but I always want to go over the top, so I added some more small leaves to fill in gaps in the wreath and give a feeling of leaves floating freely in midair.
Finishing the Quilt
Once you’re satisfied with the wreath, all that’s left is to square up the quilt, add a hanging sleeve, and bind it.
You can use the techniques in this post and and a few applique leaves to make a quilt that looks quite a bit different from the featured wreath quilt. Here’s a leaf quilt I made last year, photographed by Jessica Chase Creative. The background and leaves were pretty much the same, but I laid them out differently to create the effect of leaves blowing in the wind. What do you think?
Make More Wreath Quilts with My Little Book
DECK YOUR HALLS with these easy little quilts you can make in a day or less. Christmas wreath quilts are perfect for decorating your own home for the holidays, or to make as a gift for someone you love.
My book includes quilt patterns for four beautifully simple Christmas wreath wall hangings you can make to fill your home with holiday spirit. Click or tap the book cover photo to get your copy today.
Note to readers: Some of the links in this post are affiliate links. If you buy something through a link, I may receive a small payment (at no extra cost to you) that helps support the costs of running this blog. Thank you for your support!
Love the leaves! I need to figure a way to make a hanging spot on non-wood front door, so I can put different wreaths for various holidays/seasons. Thanks.